Installing a CPU is one of the most crucial steps in building a DIY PC. It’s a delicate task that demands precision, patience, and attention to detail. Incorrect installation can lead to bent pins, thermal inefficiency, or even permanent hardware damage. In this article, we’ll guide you through the process of installing a CPU, explain the differences between Intel and AMD sockets, and provide essential tips to ensure a successful installation on both platforms.
Why Installing a CPU Properly Matters
The CPU (Central Processing Unit) is the brain of your computer. Its connection to the motherboard must be firm and accurate, as it processes millions of instructions every second. Poor contact with the socket, misalignment, or contamination (like thermal paste spill) can result in performance loss, overheating, or system failure.
1. Understanding CPU Socket Types
Intel Socket Types and Characteristics
Intel CPUs do not have pins on the processor—instead, the pins are inside the socket. This design is called LGA (Land Grid Array).
- LGA 1151 / 1150: Older sockets for 6th–9th Gen CPUs (not compatible with newer CPUs).
- LGA 1200: For 10th and 11th Gen Intel CPUs.
- LGA 1700: For 12th, 13th, and 14th Gen Intel Core processors (Alder Lake, Raptor Lake).
Important Notes for Intel:
- CPU must be placed gently to avoid bending the motherboard socket pins.
- The socket cover will automatically eject as you close the retention arm.
AMD Socket Types and Characteristics
AMD uses PGA (Pin Grid Array) for most Ryzen CPUs, meaning the pins are on the CPU itself and the socket has holes. However, newer high-end platforms (like Threadripper) use LGA.
- AM4: For Ryzen 1000–5000 series (mainstream).
- AM5: For Ryzen 7000 series (DDR5 required, LGA design).
- TR4 / sTRX4 / sWRX8: For Threadripper CPUs, use large LGA sockets.
Important Notes for AMD:
- Pins on the CPU are delicate and easily bent.
- AM4 and AM5 CPU installation processes are different due to PGA vs LGA socket difference.
2. Preparing the Workspace
Before you start:
- Use an anti-static mat or wrist strap to prevent static discharge.
- Make sure the motherboard is on a flat, non-metallic surface (ideally inside its box).
- Wash your hands and handle the CPU only by the edges.
3. Step-by-Step: Installing the CPU
Intel CPU Installation (LGA Sockets)
- Locate the CPU socket on the motherboard (e.g., LGA 1700).
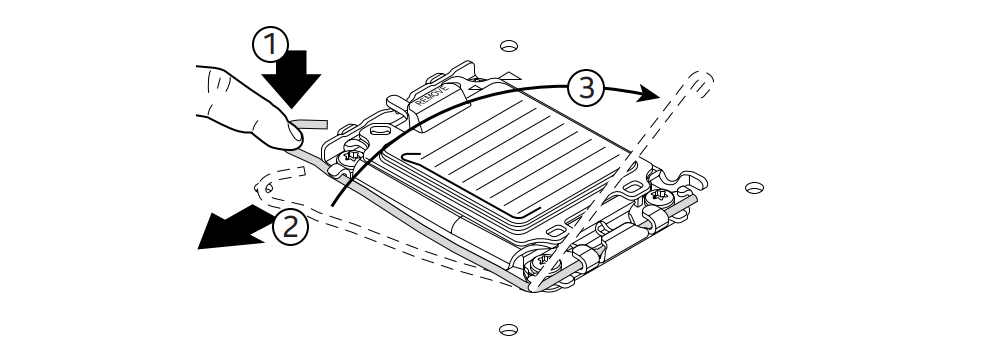
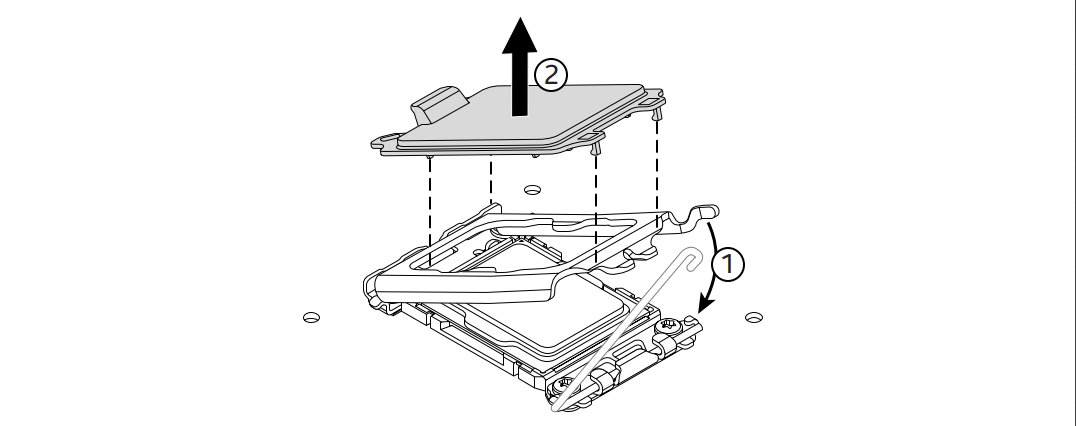
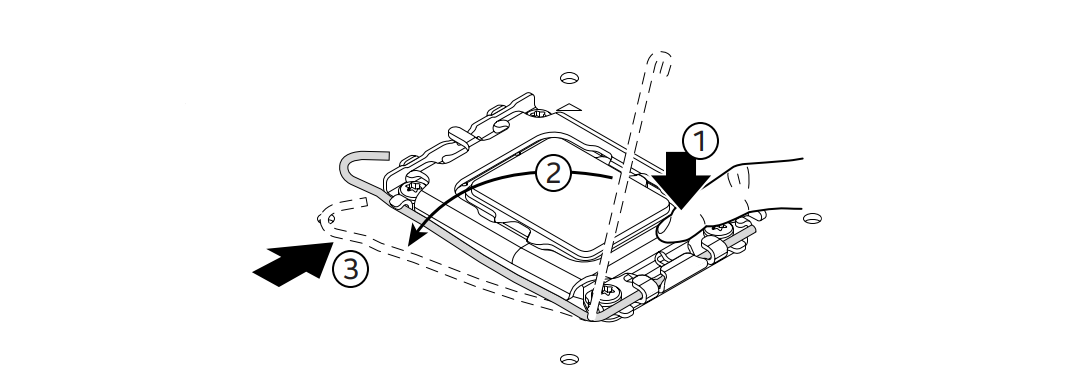
- Release the socket lever: Press down and push the metal arm to the side to lift the retention bracket.
- Remove the plastic socket cover. (Don’t throw it away—you might need it for RMA or resale.)
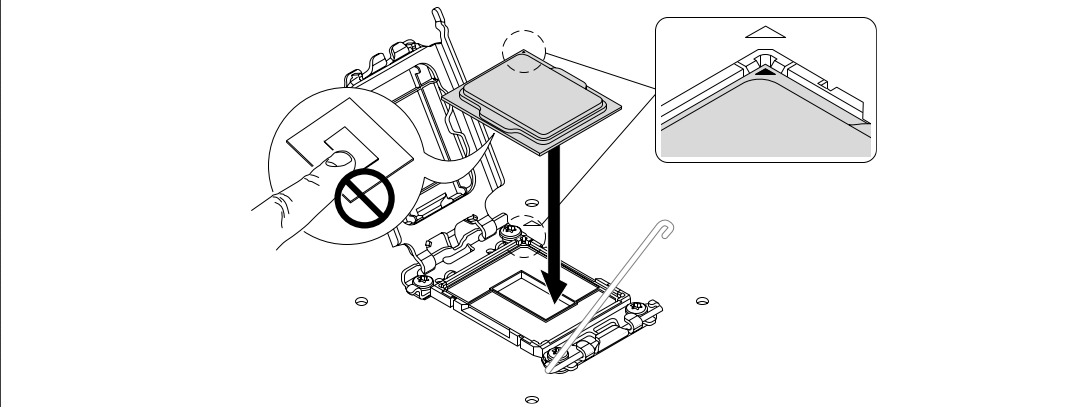
- Align the CPU correctly:
- Find the gold triangle on the corner of the CPU.
- Match it with the triangle mark on the socket frame.
- The notches on the CPU will line up with the socket guides.
- Gently lower the CPU into the socket—no force required.
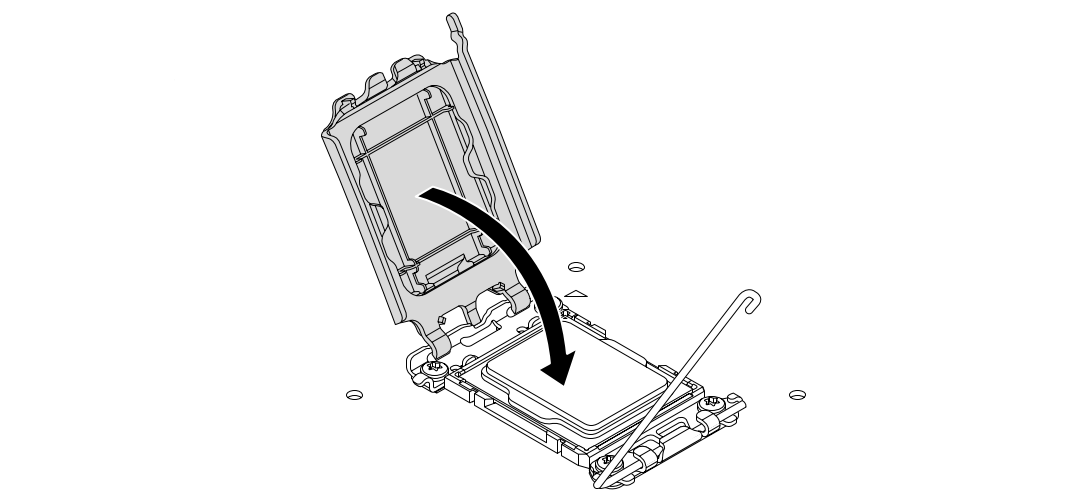
- Close the socket bracket and lever. The protective plastic cover will pop off automatically.
- Ensure the CPU is locked in place and flush with the socket.

AMD AM4 CPU Installation (PGA Socket)
- Locate the AM4 socket with a small lever on the side.
- Lift the retention arm all the way up.
- Align the triangle on the CPU with the triangle on the socket.
- Gently lower the CPU into the socket—do not push or wiggle.
- If properly aligned, the CPU should drop into place.
- Lower the retention arm to secure the CPU in the socket.
AMD AM5 and Threadripper Installation (LGA Sockets)
- AM5 uses LGA (like Intel), so follow the same alignment and no-push logic as Intel LGA sockets.
- Threadripper CPUs are very large and require a Torque Wrench Tool (usually included) and a two- or three-point locking mechanism—follow motherboard manual carefully.
4. CPU + Motherboard Compatibility Checklist
Before you install, double-check these:
✅ Socket Compatibility
- Intel Core i7-14700K → LGA 1700 socket, supported by Z690, Z790, B660, etc.
- AMD Ryzen 7 5800X → AM4 socket, compatible with B550, X570 boards.
✅ BIOS Version
- Newer CPUs may require a BIOS update for older motherboards.
- If your motherboard doesn’t support BIOS Flashback, you’ll need a compatible older CPU to update.
✅ Chipset Features
- Features like PCIe 5.0, DDR5, overclocking support vary by chipset.
- Some motherboards limit CPU performance due to VRM or power delivery.
5. Tips and Troubleshooting
| Problem | Possible Cause | Solution |
|---|---|---|
| CPU won’t fit | Wrong orientation or socket | Double-check triangle alignment |
| CPU won’t drop into AMD socket | Bent pins | Inspect CPU pin grid carefully |
| Intel socket cover doesn’t pop off | Didn’t close lever properly | Apply full downward pressure |
| System won’t POST | Wrong BIOS version | Use BIOS Flashback (if available) |
| Overheating after install | Cooler not installed or paste missing | Reapply thermal paste and remount |
6. Final Steps: Prepare for Cooler Installation
After CPU is installed:
- Clean the CPU heat spreader with isopropyl alcohol if needed, especially for the used CPU.
- Apply a small pea-sized dot of thermal paste to the center.
- Mount your air cooler or AIO water block securely.
- Plug in the CPU fan header (usually labeled “CPU_FAN” on the motherboard).
Conclusion
Installing a CPU may seem intimidating, but with the right preparation and understanding of socket-specific procedures, it becomes a straightforward process. Always refer to your motherboard manual and CPU packaging for specific instructions. Whether you’re using Intel’s LGA or AMD’s AM4/AM5 platform, remember: never force anything into place, keep your components clean, and double-check alignment. A well-installed CPU is the foundation for a powerful, stable PC build.